.png)
.jpg)

Product
Fast keyword detection with LMUs on GPU

The Legendre Memory Unit (LMU) algorithm is a new alternative to LSTMs and Transformers with some key advantages, especially at the edge. NengoEdge makes it easy to build LMU models with any dataset and deploy those models anywhere. In this article, we'll show how easy it is to use NengoEdge to deploy a keyword detection model using LMUs on a general purpose Nvidia GPU.
The goal of our model will be to add voice controls to a device that moves along two dimensions, like a plotter. We want to be able to say what direction to move, and to be able to stop it when it reaches the desired location by saying "stop."
Set up your dataset
The first step is to set up your dataset. In NengoEdge, you can upload your own raw audio files, or use the SpeechCommands audio files that are available when you create your account. Raw audio files are used to make Datasets, which let you specify how to use those raw audio files in your machine learning pipeline.
- Click on Datasets in the top bar.
- Under the SpeechCommands v2 heading, click New dataset.
- Give the dataset a name.
We will use the name "Directions" - Set the dataset parameters.
We will select the keywords "up, down, left, right, stop" - Click Create.
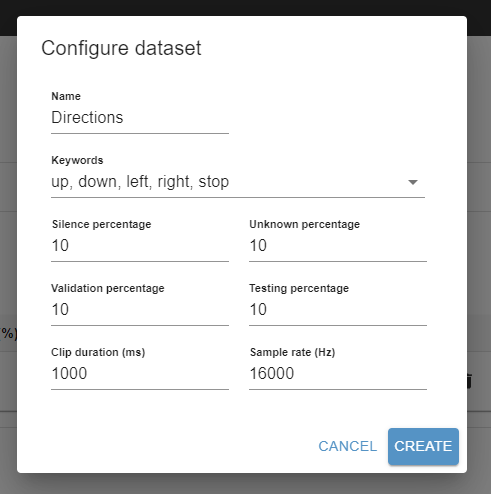
If you're unsure of what a parameter does, hovering over it will display a tooltip with more information.
Find a successful test run
We recommend doing at least one shorter test run to make sure that your longer run will yield good results. If you're using your own raw audio files, you may need several test runs to find a good set of parameters.
Training time can get expensive, so shorter test runs save money in the long run. You can reuse the weights from the short run as the starting point for longer runs, so there's no downside to a test run.
- Click on Runs in the top bar.
- Click on Create new project to organize the runs for this project.
We will use the name "Directions" - Under the Directions heading, click +KWS to create a new keyword spotting run.
- Set the run parameters.
- We will use the name "Directions test 1"
- We will use the LMU-large network to leverage the power of LMUs
- We will set the number of training steps to 2000
- We will set the validation interval to 100
- Click the Optimize button.
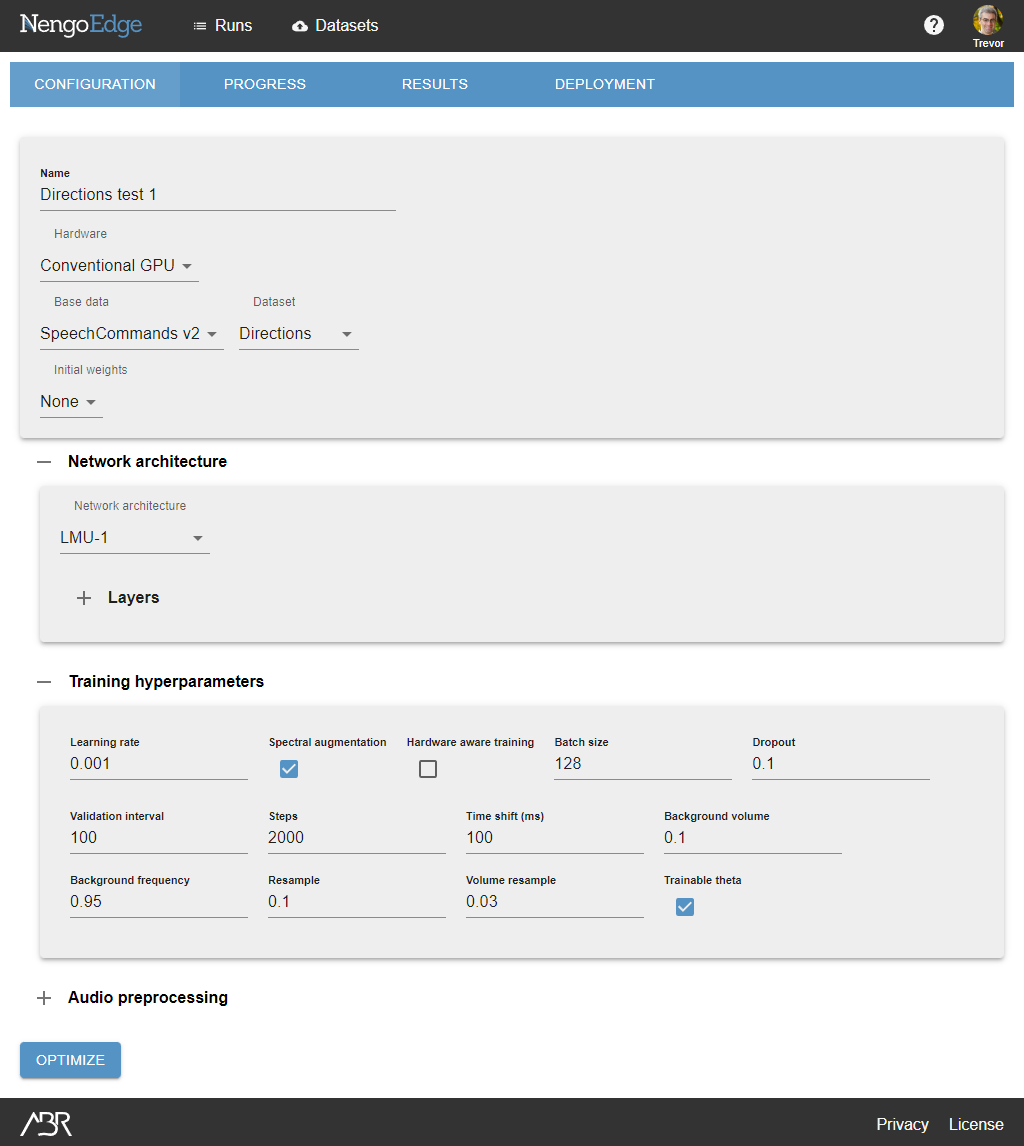
These parameter will result in a run that finishes in around an hour, and will give more feedback on performance in these early training stages.
The Progress tab gives you a rough idea of whether your test run is successful.
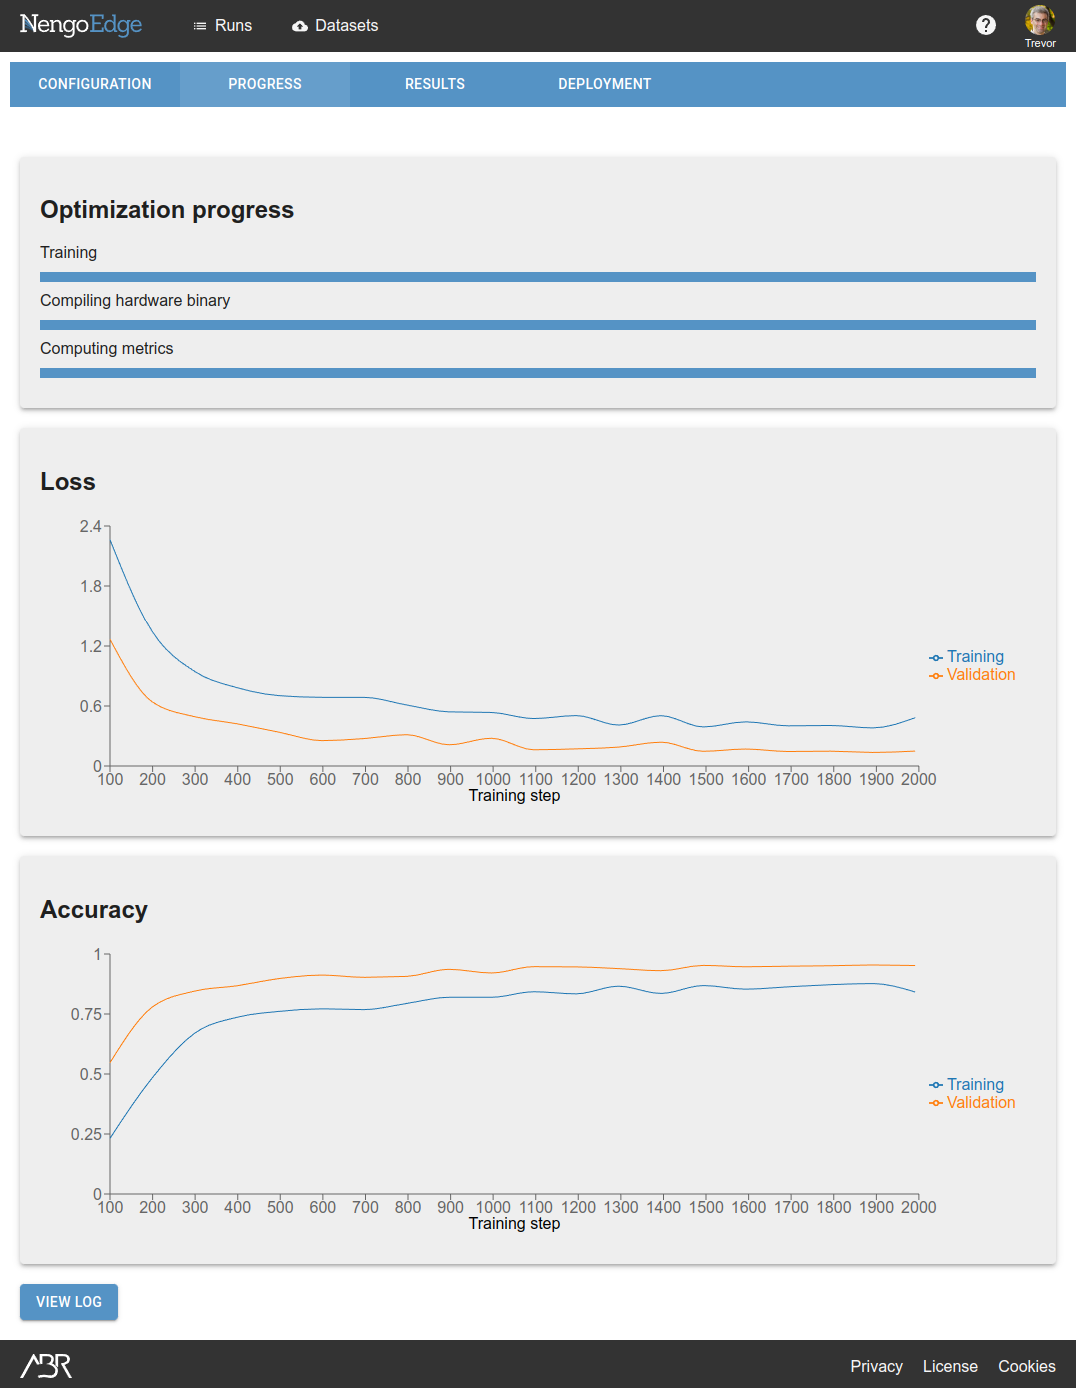
In this case, our loss is going down steadily, and the validation accuracy reaches a good level, so we will consider this a successful test run.
With the built in SpeechCommands v2 dataset, we expect performance to be very good using default run parameters. However, using your own dataset may require parameter tweaking.
If this wasn't the case, we can look at the Results tab to see where the model is underperforming to guide future test runs.
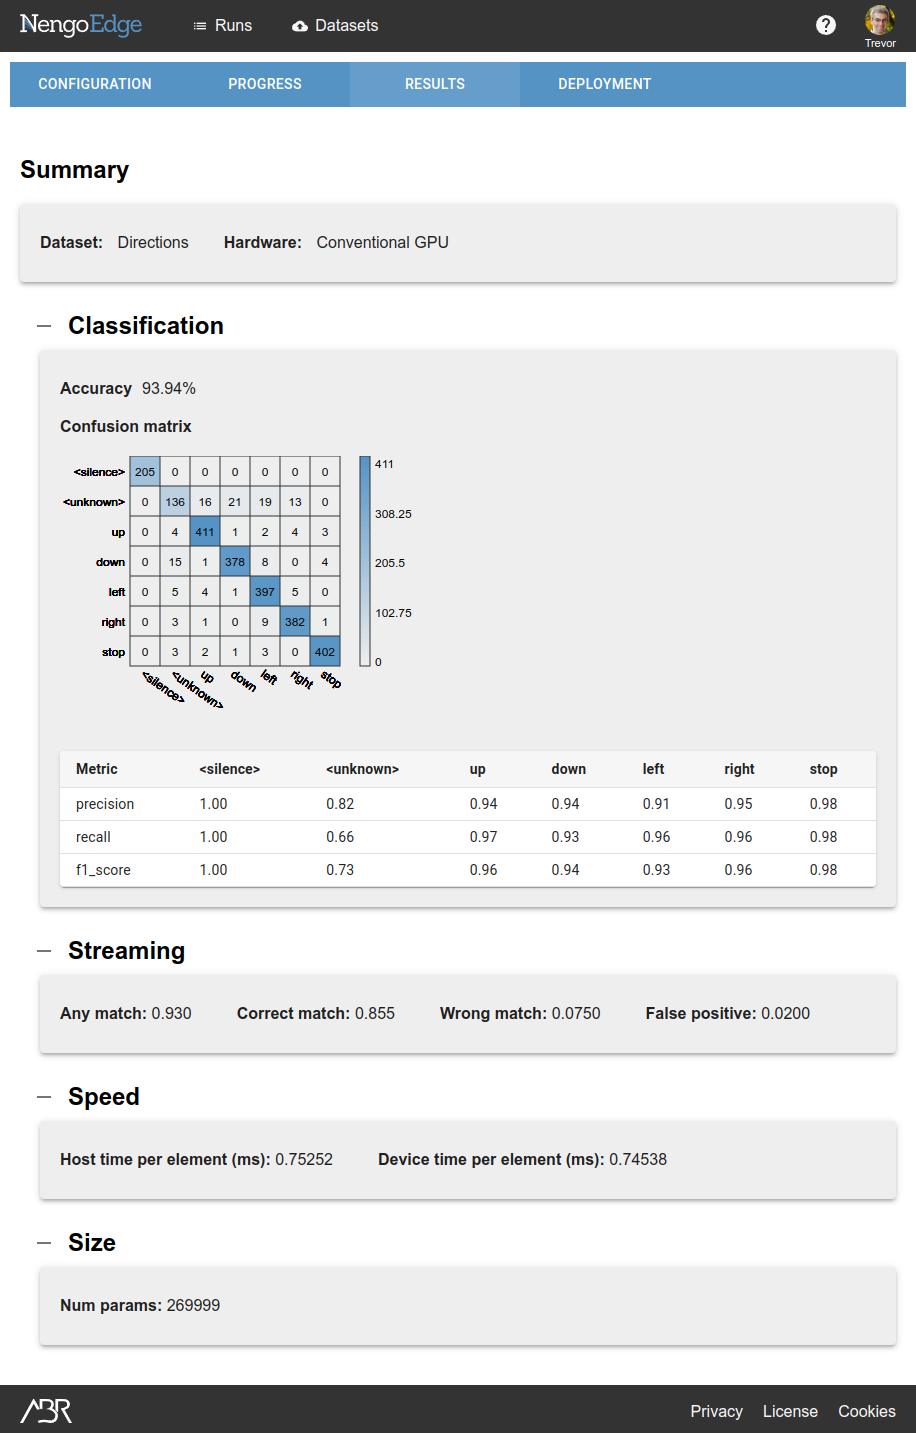
The confusion matrix can identify specific labels (words) that are not being classified well, which can help direct data collection when using your own dataset. General accuracy metrics can help you identify other issues. Experiment with the run parameters to see how each parameter affects performance metrics if your accuracy numbers are too low.
Set up a full training run
Once you are satisfied with your test run, create a new run to train to convergence.
- Click on Runs in the top bar.
- Under the Directions heading, click +KWS.
- Set the name to "Directions full 1"
- Click the drop-down next to Initial Weights. Select the successful test run, "Directions test 1".
- Set other run parameters.
- We will set the number of training steps to 20000
- We will set the validation interval to 500 - Click the Optimize button.
These parameter will result in a run that finishes in several hours, and will give coarse feedback compared to the test runs.
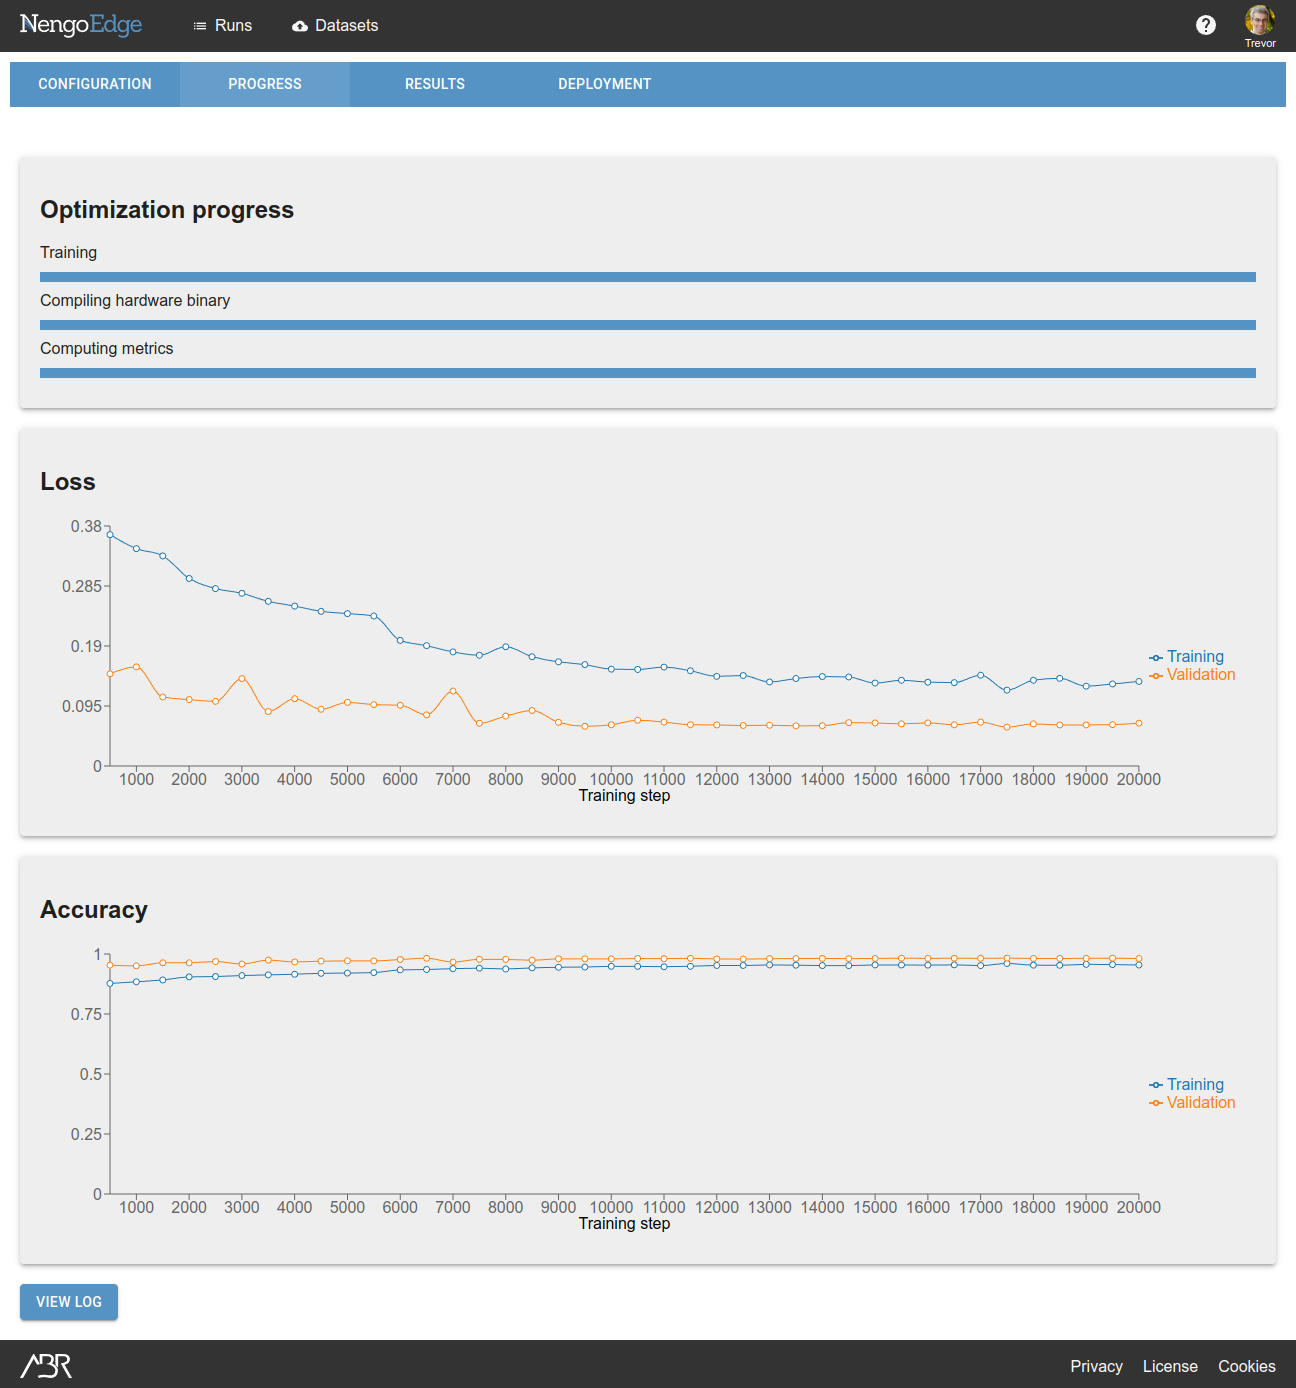
You will see on the Progress page that initial performance will start around where the test run finished off. By the end of the optimization process, performance should be even better. In our case, we started at 93.94% accuracy and finished at 97.85% accuracy.
If you want to deploy this model to an edge device, you can stop here and go to the tutorial for your target device.
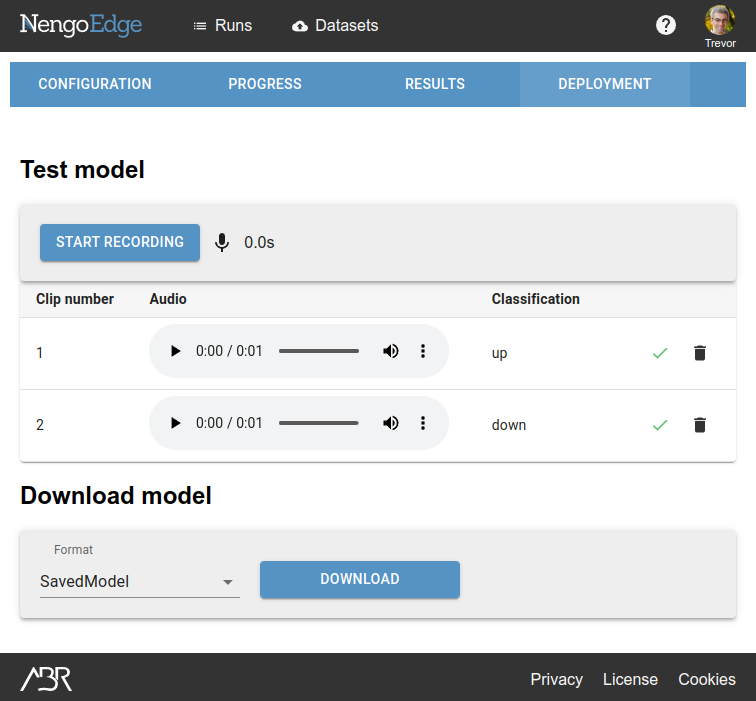
Test and deploy the trained model
Your model is now ready to be deployed to your environment and used either by itself or as part of a larger system. Steps for integration will depend on your setup, but here we will show how to do a simple deployment using NengoEdge tools and the SavedModel format.
NengoEdge tools is a Python package that assists in taking a trained model exported from NengoEdge and deploying it in your own application. We will use it to deploy the model we trained, which we will export in SavedModel format.
- Install NengoEdge tools following these steps.
- Download the live microphone demo to a local directory.
- Open NengoEdge to the main Runs page.
- Click the Deploy icon next to the fully trained run.
- Under the Download model heading, click the Format dropdown and select Binary.
- Click the Download button.
- Extract the downloaded artifact.zip to the same directory as the live microphone demo.
- Open the demo with jupyter notebook /path/to/microphone-demo.ipynb
- Edit the notebook to use the labels defined in the dataset
After running each cell in the notebook, you should see the message "Press Enter to quit," at which point you can speak into your microphone to see your model classify keywords in real time.


.png)


